How to: Run SPCAF in a TFS/VSO TeamBuild |
SharePoint code analysis can also be executed during a TFS Team Build. This helps to ensure the correctness of the SharePoint code. During the Team Build all found errors and warnings are listed in the build result. Additionally the SPCAF reports can be generated and saved to the output directory.
SPCAF supports the Team Build with the following products:
- TFS 2010
- TFS 2012
- TFS 2013
- Visual Studio Online
To support TFS 2010 and TFS 2012/2013 and VSO, SPCAF includes three build activities, which can be integrated into the workflow of a Team Build, depending on the version of TFS. The build activities can be found within the installation directory of SPCAF in subfolder "TeamBuildActivities".
- SPCAF.BuildActivity.TFS2010.dll for TFS 2010
- SPCAF.BuildActivity.TFS2012.dll for TFS 2012
- SPCAF.BuildActivity.TFS2013.dll for TFS 2013 and Visual Studio Online
Note: The build activities should not be copied directly into the installation folder of SPCAF because SPCAF searches during analysis within the installation folder for custom rules. As the activities depend on Team Build assemblies they cannot be loaded and SPCAF cannot execute.
Note: If you are enabling external analysis tools e.g. CAT.NET, FxCop etc. sometimes these tools are crashing or hanging during the analysis and Windows shows an error message with the text "[Processname] has stopped working". This window must be closed manually by the user.
As nobody can close this window on a build server you should disable this error window via a registry setting.
You should add a new DWORD value with name DontShowUI and value '1' under the following keys:
HKEY_LOCAL_MACHINE\Software\Microsoft\Windows\Windows Error Reporting
Note: If you are not familiar with configuration of team builds in TFS please request somebody to help you. If you like you can reach out to one of our consulting partners who can also help you to analyse the results or implement custom rules.
Pre-requisites
Before configuring the SPCAF ingegration for the automated build process of Team Foundation Server (TFS) or Visual Studio Online (VSO), it is required to configure the build controller to build SharePoint projects and apps.
If you are using Visual Studio Online with the Hosted Build Controller, then this has been already done by Microsoft. If you use your own custom build controller with VSO or TFS, then you have to complete the following configuration steps on your build controller:
- Install TFS Team Build
- Install Windows SDK
- Install Build Support for Apps for Office and Apps for SharePoint
- Install SharePoint Farm and Sandboxed Solution Build Support
- Install Office Developer Tools Assemblies to the GAC
- Install Required MSBuild Dependencies
- Install Workflow Dependencies to the GAC
After this configuration is completed you should verify it by
- Building an App for Office or App for SharePoint Project, or a SharePoint Farm or Sandboxed Project
- Create a Build Defintion for that project (read how to in this MSDN article)
- Configure the Build Definition to create a package for the Office Developer Tools Project
All the preparation and verification steps listed above are described in these MSDN articles:
- How to Build Office Developer Tools Projects with TFS Team Build 2012 when using TFS 2012/2013 and custom build controllers in VSO
- How to Build SharePoint Projects with TFS Team Build when using TFS 2010
When you have successfully built and packaged SharePoint projects with your TFS build controller it is save to proceed with the SPCAF integration described below.
Preparation
To run SPCAF on the build server the SPCAF assemblies must be available on the build server.
Note: You do not need to install SPCAF on the server! The assemblies are pulled on each build from source control to avoid installing them on the build machines. By this they can be updated centrally in source control when a new SPCAF release is available and you can assure that all build servers use the same version.
- Download a preconfigured package of SPCAF Server from the Visual Studio Gallery
- Extract the downloaded package to a temporary directory, e.g. c:\temp\SPCAFTemp
- Open Source Control of TFS and navigate to folder "BuildProcessTemplates" of your team project
- Create there a subfolder "CustomAssemblies" and check in
- Within this folder create a subfolder "SPCAF"
- Copy the extracted files from the temporary directory to the folder in TFS
- Also add the License.lic file with your license (can be found in users AppData directory)
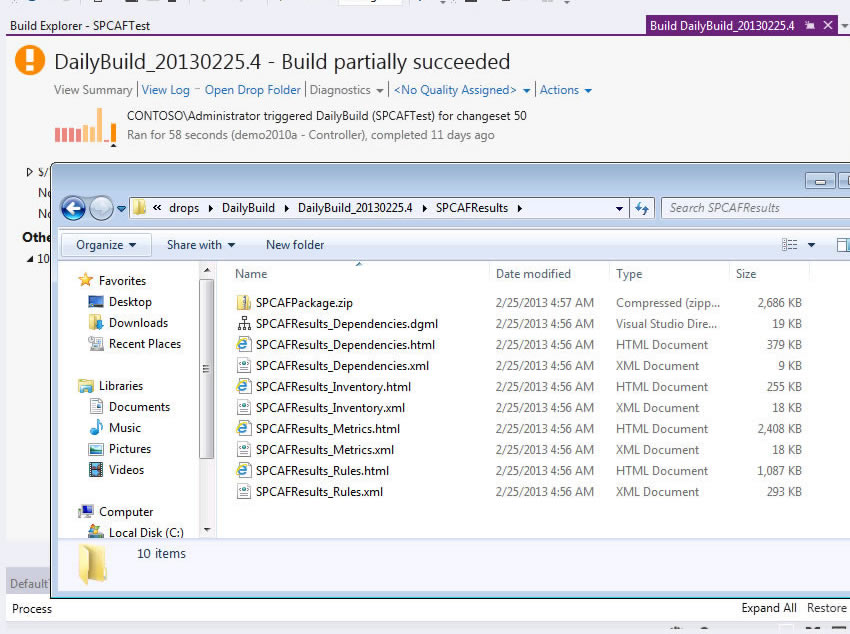
You should end up as shown in the following screenshot:

Configure Build Controller to load the SPCAF Assemblies
Now we need to tell the Build Controller that during a build the SPCAF assemblies should be loaded.
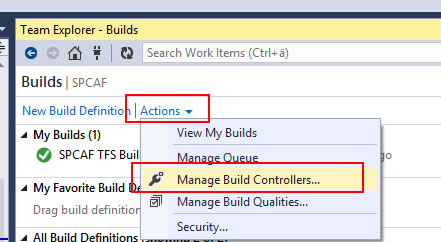
Click in Visual Studio in the "Team Explorer" in pane "Builds" on menu "Actions -> Manage Build Controllers..." (see below).
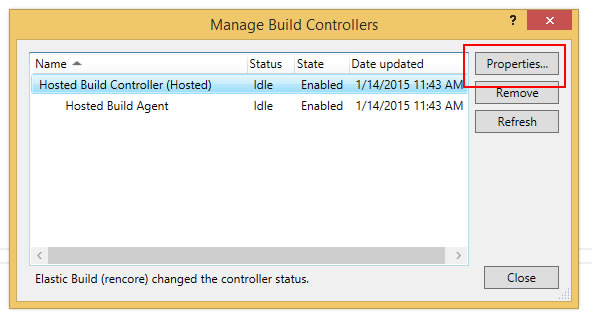
The list of available build controllers appears. Select the build controller for your SharePoint builds and click "Properties".
The following dialog for the configuration of a single build controller appears.
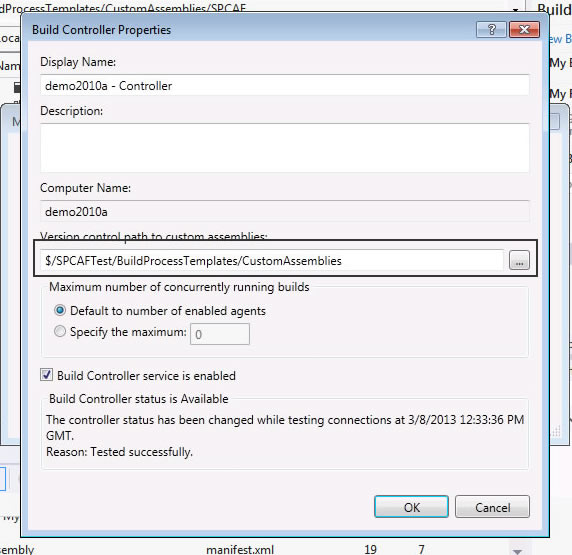
In field "Version control path to custom assemblies" you need to enter the path to the previously created folder "CustomAssemblies" (click the button "..." to search for this folder on the TFS source control system). TFS will search in this directory for the SPCAF assemblies during the build.
After you entered the path to custom assemblies close the dialog with OK.
Add SPCAF Build Activity to the Process Template
You have 2 options: You can manually add the Build Activity in the xml file or you can use the designer in Visual Studio.
You could also use the following sample TFS build templates as a start. They contain the SPCAF analysis preconfigured.
Download the template for your TFS version and save it via source control to the folder "BuildProcessTemplates" of your TFS team project.
Create then a build definition which uses the downloaded build template.
- DefaultTemplate.SPCAF.2010.xaml (TFS 2010)
- DefaultTemplate.SPCAF.2012.xaml (TFS 2012)
- TfvcTemplate.SPCAF.2013.xaml (TFS 2013)
Manually add build activity
Copy an existing process template, open it in an editor and add the following fragments to the xml to include the SPCAF assembly with the build activity to the template.
mc:Ignorable="sad"
x:Class="TfsBuild.Process"
xmlns:this="clr-namespace:TfsBuild;"
...
xmlns:sb="clr-namespace:SPCAF.BuildActivity;assembly=SPCAF.BuildActivity.TFS2010"
xmlns:x="http://schemas.microsoft.com/winfx/2006/xaml">
<x:Members>
...
To integrate the SPCAF activity into the build process we recommend to add the activity after the finished build and finished tests.
Search for activity with DisplayName "If TestStatus = Unknown" and place the SPCAF activity "RunSharePointCodeAnalysis" after this activity.
<If ... DisplayName="If TestStatus = Unknown" mtbwt:BuildTrackingParticipant.Importance="Low">
...
</If>
<sb:RunSharePointCodeAnalysis
DisplayName="Run SharePoint Code Analysis SPCAF"
SettingsFile="{x:Null}"
TempFolder="{x:Null}"
FailBuildOnError="False"
IgnoreExceptions="False"
InputDirectory="[BinariesDirectory]"
LogExceptionStack="True"
Filters="*.wsp;*.app"
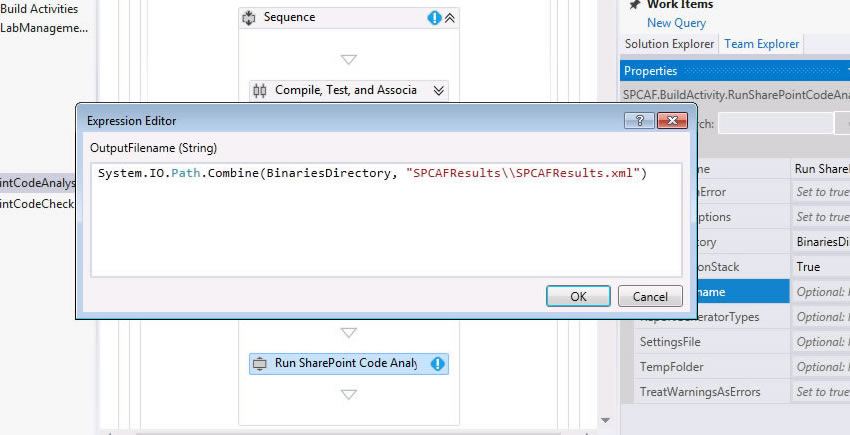
OutputFilename="[System.IO.Path.Combine(BinariesDirectory, "SPCAFResults\\SPCAFResults.xml")]"
ReportGeneratorTypes="HTML;XML;DGML;DOCX"
LogFile="[System.IO.Path.Combine(BinariesDirectory, "SPCAFResults\\spcaf.log")]"
TreatWarningsAsErrors="False" />
<If ... DisplayName="If TreatTestFailureAsBuildFailure And (TestStatus = Failed)" ...
NOTE: Because in TFS 2013 the default build process template is a little bit different we need to add a variable to store the path to the Binaries Directory. Open the tab "Variables", add a variable named "BinariesDirectory" with the type "String", you can leave the scope in its default setting (for more information visit Joost Haneveer: How to run SPCAF analysis during TeamBuild in TFS 2013).
Add Build Activity with Designer in Visual Studio
If you don't want to add the build activity to the process template in XML you can use a visual designer in Visual Studio.
- 1. Make a copy of an existing Process Template e.g. DefaultTemplate.xaml in TFS an name it for instance DefaultTemplateSPCAF.xaml
- 2. Create a new project of type Class library in Visual Studio and delete the default created Class.cs
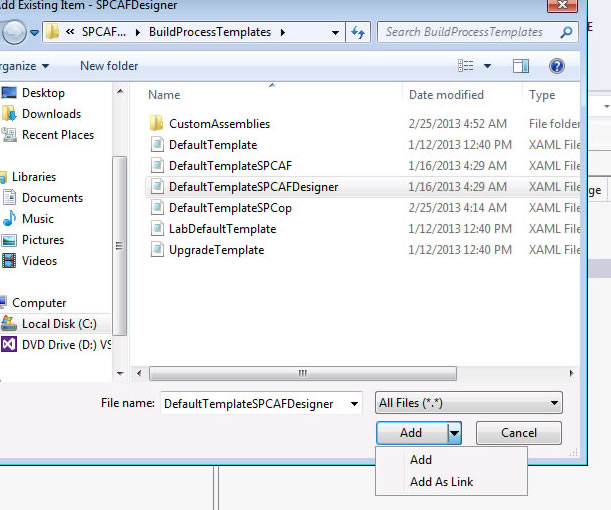
- 3. Add the copied Process template 'DefaultTemplateSPCAF.xaml' to the project via "Add Existing Item" and navigate to the folder with DefaultTemplateSPCAF.xaml. Important: Select "Add As Link" in the dialog to add only a link to the file.
-
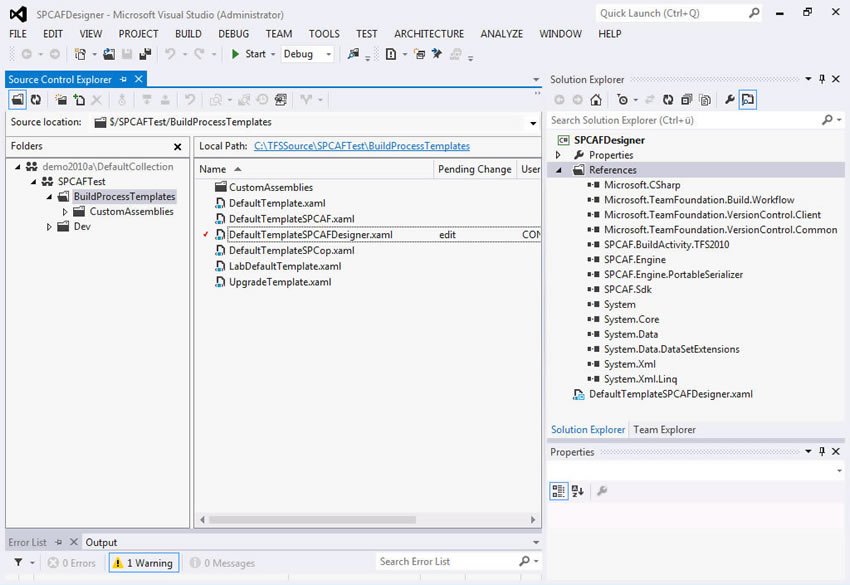
4. Add the necessary reference to the project:
- Microsoft.TeamFoundation.Build.Workflow.dll
- Microsoft.TeamFoundation.VersionControl.Client.dll
- Microsoft.TeamFoundation.VersionControl.Common.dll
- 5. Add reference to SPCAF.BuildActivity.TFS2010 (or ...TFS2012/...TFS2013) to the project from the previously created folder "CustomAssemblies"
See below the Visual Studio project with all references, the linked DefaultTemplateSPCAF.xaml
- 6. Open the process template in designer.
- 7. Add the SPCAF build activity to the toolbox: Right click in toolbox and select "Choose items...". In tab System.Activites Components select "Browse..." and select the assembly SPCAF.BuildActivity.TFS2010 (or ...TFS2012/...TFS2012) from the folder "CustomAssemblies". The Build Activity appear in the toolbox.
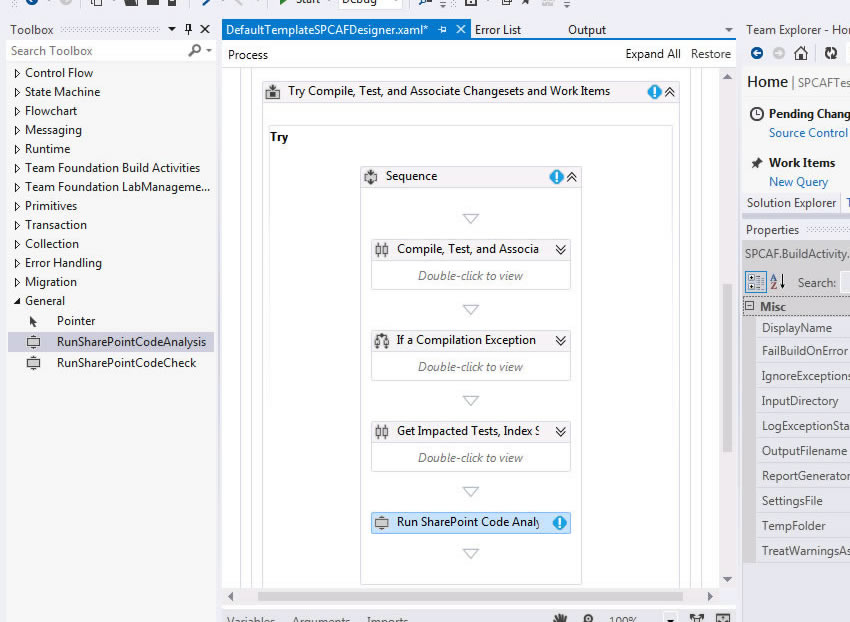
- 8. In the process template navigate to Activity "Try Compile, Test and Associate..." and open the try block. Drag the SPCAF build activity add the end of the Sequence.
You should end up with the following setup:
- 9. Configure the build activity to your needs (see parameters below).
- 10. Save the process template and check in.
Parameters of Build Activity
The following parameters can be configured for the build activity.
| Argument | Description | Sample Value |
|---|---|---|
| DisplayName | Required String. Title of activity, used in logfiles. | "Run SharePoint Code Analysis SPCAF" |
| SettingsFile | Optional String. Name of settings file in folder "/RuleSets" or full path to a different ruleset file. | |
| TempFolder | Optional String. Path to temp folder. If not set SPCAF uses a standard temp folder. | |
| FailBuildOnError | Optional Boolean. Default FALSE. If TRUE the build fails if SPCAF detects errors. | FALSE |
| IgnoreExceptions | Optional Boolean. Default TRUE. TRUE to ignore exceptions during analysis. Settings this value helps to ensure that the build finishes successfully also in case of exceptions. | TRUE |
| InputDirectory | Required String. Path to WSP solutions. Can be a folder name or a list of files (separated by ';'). | BinariesDirectory |
| Filters | Optional String. List of regular expressions (separated by ';') which are used as a filter for the files loaded from InputDirectory. | *.wsp;*.app |
| LogExceptionStack | Optional Boolean. Default FALSE. In case of problems with SPCAF setting this value to TRUE adds more information to the logfile which describes the error in detail. | FALSE |
| OutputFilename | Optional String. Defines the ouptput filename of the reports. Typically the output folder should be in the BinariesDirectory. After successful build the whole BinariesDirectory is copied to the DropLocation. Alternatively the DropLocation or any other folder can be used to save the results. | System.IO.Path.Combine(BinariesDirectory, "SPCAFResults\\SPCAFResults.xml") |
| LogFile | Optional String. Defines the path to the log file. | System.IO.Path.Combine(BinariesDirectory, "SPCAFResults\\spcaf.log") |
| ReportGeneratorTypes | Optional String. Defines which reports should be created | HTML;XML;DGML;DOCX;PDF |
| TreatWarningsAsErrors | Optional Boolean. Default FALSE. If TRUE all warnings will be evaluated as errors. | FALSE |
| ThrowExceptionOnError | Optional Boolean. Default FALSE. If TRUE an exception will be throw in case of critical errors or errors. | FALSE |
| Verbosity | Optional String. Detail level of output (e.g. minimal, default: normal). | normal |
| SkipProjectCreation | Optional Boolean. Default FALSE. If TRUE no project (.spcaf) file is created as output of the analysis. | FALSE |
The build activity returns the following values after analysis.
| Argument | Description |
|---|---|
| CriticalErrors | Integer. Contains the number of critical errors after analysis. |
| Errors | Integer. Contains the number of errors after analysis. |
| CriticalWarnings | Integer. Contains the number of critical warnings after analysis. |
| Warnings | Integer. Contains the number of warnings after analysis. |
| Information | Integer. Contains the number of information after analysis. |
Create a new Build Definition
Now we can use the new process template in a new Build Definiiton
- 1. Create a new Build Definition in TFS
- 2. In the build definition goto tab "Process" and select "New.." and "Select an existing XAML file" and choose the DefaultTemplateSPCAF.xaml
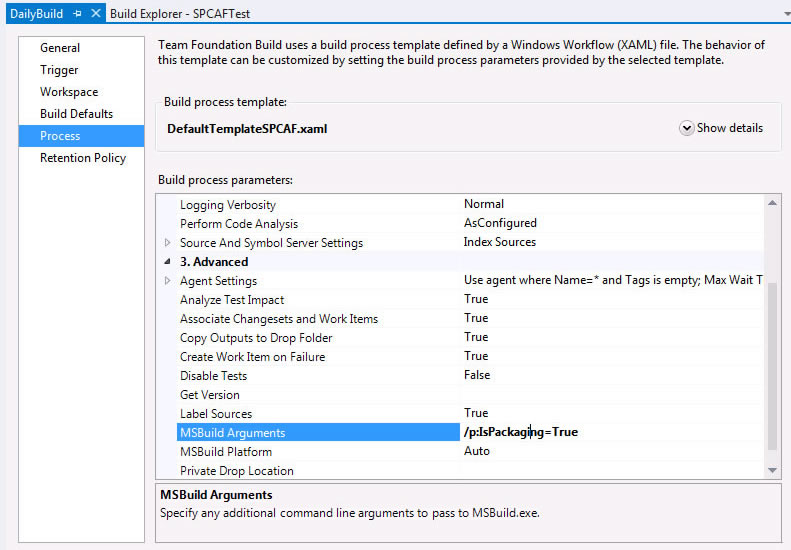
- 3. For building SharePoint projects a special setting is needed: Go in process tab to "3. Advanced" and change the parameter "MSBuild Arguments" to "/p:IsPackaging=true". This ensure that during the build process the WSP files are created.
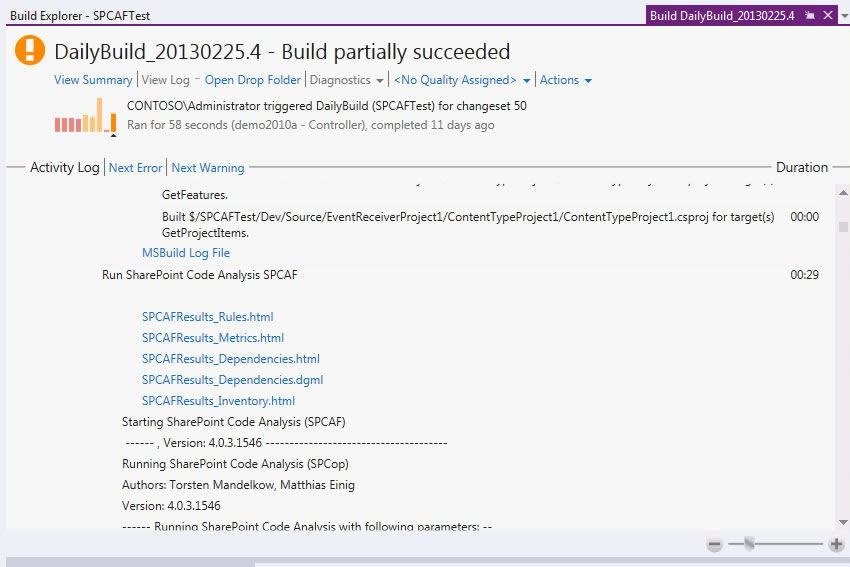
- 4. Run a build with the new Build Definition. To check if SPCAF was configured correctly check the log. There you can find the output of the analysis.
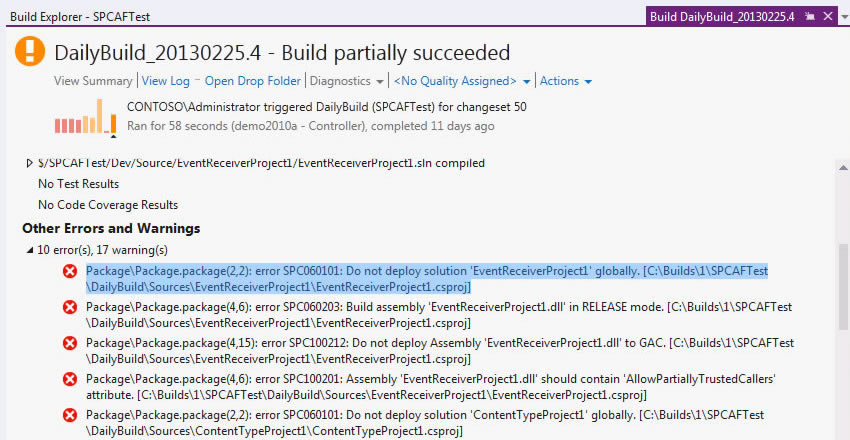
- 5. In case of found errors and warnings during analysis the result can be found in the Build Summary.
- 6. Navigate to the DropLocation. There you should find the create SPCAF reports.